Images & design
Printable wall art sizes: match the ratio before adding more pixels
Work out which print sizes fit your artwork, calculate useful pixel dimensions, and make a clear size guide without stretching or overpromising.
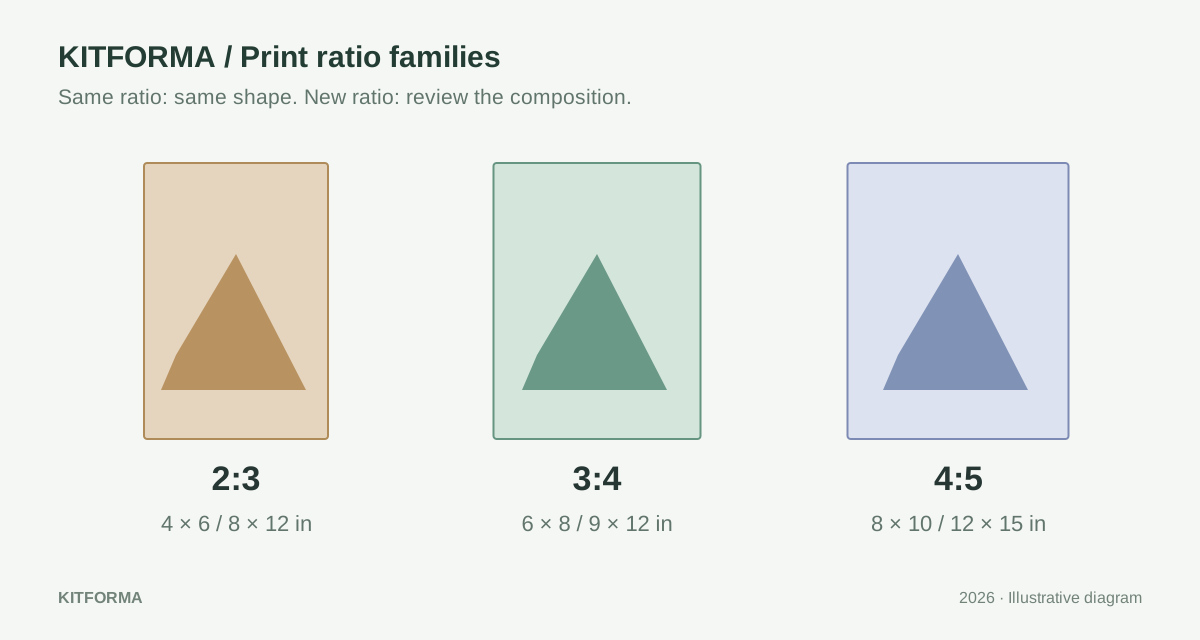
Organize the product by shape
Start with the print sizes you want to support and group them by width-to-height ratio. This reveals which prints can share a composition and which need a separate crop, instead of promising many frame sizes with one unexplained file.
For portrait artwork, 4 × 6, 8 × 12 and 12 × 18 inches all use a 2:3 ratio. A 4:5 composition serves sizes such as 8 × 10 and 12 × 15 inches. A 3:4 composition serves 6 × 8 and 9 × 12 inches. The examples are arithmetic groups, not a claim that these are the best-selling frame sizes or requirements of a marketplace.
Give each family a distinct export name and a short list of the sizes you have actually checked. A compact, accurate menu is more useful than a long list that hides cropping, resolution or border differences. If the artwork contains a signature, border or precisely placed lettering, inspect those elements separately in every family.
Calculate pixels from the intended print
Pixels per inch, or PPI, relates image pixels to physical print length. Multiply inches by your chosen PPI to estimate the pixel dimensions you need. Use the print provider’s specification when one is supplied; 300 PPI below is a worked planning target, not a universal promise of print quality or an Etsy rule.
For an 8 × 10 inch print at that target, the calculation is 2400 × 3000 pixels. A 12 × 18 inch print becomes 3600 × 5400 pixels. Check both directions rather than looking only at the longer edge. A file with enough height but insufficient width may have the wrong shape, not simply too little resolution.
If you work in centimetres, divide by 2.54 to get inches before multiplying by PPI. Keep the original measurement and unit in your notes so a later helper does not read 20 centimetres as 20 inches. Round the resulting pixel dimensions deliberately, then verify that the small rounding difference does not affect a precise print layout.
8 × 10 in at 300 PPI → 2400 × 3000 px
12 × 18 in at 300 PPI → 3600 × 5400 px
20 cm ÷ 2.54 ≈ 7.874 in
7.874 in × 300 ≈ 2362 pxWork backward from the original file
Suppose your original is 3000 × 4500 pixels. At 10 × 15 inches it supplies 300 PPI; at 12 × 18 inches it supplies 250 PPI. Those calculations describe how the available pixels are distributed. Whether the result looks good also depends on the artwork, paper, printing process and viewing distance. Print a sample instead of treating the calculated number as a quality certificate.
Changing only the PPI metadata does not add image detail. Resampling creates a different pixel grid, but enlarging an already soft image does not restore the original line work. For lettering or vector illustration, return to the source design and export at the required size when possible. For a photograph, keep the best original capture available.
Do not use a small marketplace mockup as the source of the paid printable. A room scene may show the art convincingly while containing too few pixels of the artwork itself. Deliver the clean design at its verified size; use the scene only to illustrate how the product might look.
Choose cropping or borders explicitly
A 2:3 image cannot fill a 4:5 frame without changing something. Stretching changes shapes. Cropping removes part of the artwork. Fitting the full image keeps it intact but leaves space. Make that decision in the product design rather than leaving every buyer to discover it in a print dialog.
For the 3000 × 4500 source, a 4:5 crop retaining all 3000 pixels of width is 3750 pixels high. You remove 750 pixels vertically, or 375 from both top and bottom for a centered crop. Before applying it, check whether those bands contain a title, signature or important subject detail. Moving the crop may work, but cannot recover everything if the composition was tightly framed.
Alternatively, fitting the whole 2:3 image within an 8 × 10 inch area gives an image approximately 6.67 × 10 inches, leaving about 0.67 inches on each side. If this is the intended version, label it as bordered and show the border in the preview. KitForma can crop and resize images, but those tools do not decide which creative element is safe to remove.
4:5 crop from 3000 × 4500 px
New height = 3000 × 5 ÷ 4 = 3750 px
Removed height = 4500 − 3750 = 750 px
Centered crop: 375 px removed at each end
Check the delivered page, not only the image
If you deliver a PDF, inspect its page dimensions as well as the artwork placed on it. A high-resolution image can still sit at the wrong physical size on a PDF page. Decide whether the buyer should print at actual size or fit to a page, then test the exact instruction you provide. Printer margins and borderless modes can change the visible result.
KitForma’s PDF-to-images export can help inspect page appearance, but it rasterizes the chosen PDF pages and is not a print-production certification tool. Its export resolution should not be confused with the resolution of an image originally placed in the PDF. Keep vector-rich printable masters as PDFs when that is the format you designed and tested.
Proof a page containing the thinnest lines and smallest labels. Check the whole page for cropping and then look closely for rough edges or faint marks. If physical size is important, include a temporary measured test shape in your own proof copy, measure the print, and remove that test shape from the customer version.
Write a size guide that matches the files
For each delivered file, list the ratio, pixel dimensions, tested print sizes and whether it includes a border. Avoid saying that one file prints at every size or that changing DPI makes any image suitable for a large poster. A buyer should be able to select a file by its name and the guide without having to understand image resampling.
Keep previews, print files and masters in separate folders. The linked tools process supported images locally; large inputs still need device memory. Download and reopen the final files, verify their dimensions, and compare them with the size guide before attaching the package.
- Group promised sizes by ratio.
- Calculate required pixels and compare with the original.
- Make separate crops or clearly labelled bordered versions.
- Test the exported image or PDF at its intended physical size.
- List only the versions and sizes you actually provide.
KITFORMA
Put it into practice
No account needed. Open an article, then try the matching tool.
Further reading
Sources last reviewed:
How to use this guide
Published by KitForma, maintained by Fatih Erkan. The linked references explain the relevant formats and definitions. Examples use sample inputs; they do not establish a speed, quality or compatibility guarantee for your files. Check the tool’s stated limits and inspect your downloaded result.
Questions & experiences
Share what worked, ask a specific question, or suggest a correction. Never include passwords, private files or personal document details.
Loading community…