Images & design
Etsy listing photos: crop for thumbnails without losing the product
Build a clear first listing image, protect important details from cropping, and test text and product recognition at small display sizes.
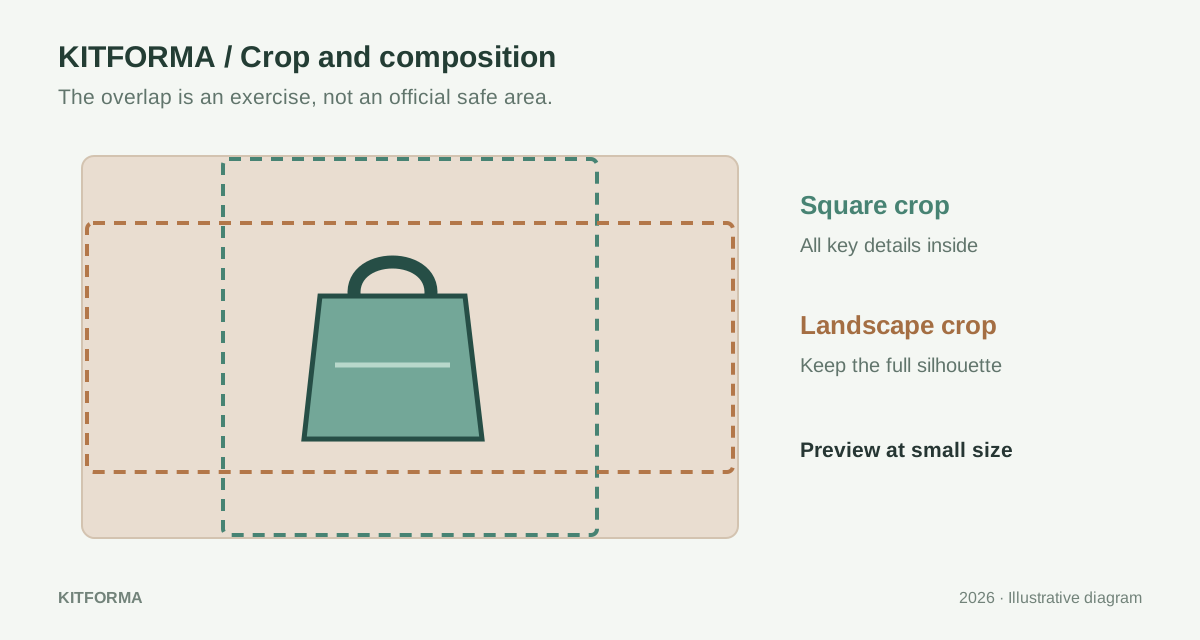
Choose what a small image must communicate
The first image has a narrow job: help someone recognize what is being offered. A shopper looking at a small card should not have to decode five labels, three product versions and a decorative frame before understanding the item. Start by writing one sentence that identifies the product, then ask which visual detail carries that sentence.
For a ceramic mug, the silhouette, handle and surface finish may matter most. For a printable planner, a readable crop of a representative page may be more useful than a distant stack of many pages. For a set of three prints, show the set clearly and use supporting images to explain the individual designs. These are composition examples, not claims about conversion rates.
Keep an untouched photograph or source design. Create a separate listing-image copy before cropping, adding explanatory text or reducing file size. This gives you room to make a new crop when the preview changes without trying to recover pixels from a compressed thumbnail.
Use Etsy’s guidance without inventing a universal template
Etsy recommends listing images at least 2000 pixels in both dimensions and a horizontal or square first image. That is a starting point for preparing a source, not a promise that every page displays the same crop. Use the actual listing and thumbnail previews to decide whether your product still reads well.
A 2400 × 2400 working export can be a convenient square example when the original has enough detail. It is not a mandatory Etsy size. If your original is only 900 pixels wide, increasing the output number does not recreate fine engraving, fabric texture or sharp lettering that was never captured. Rephotograph or re-export from the original design when those details matter.
Crop the composition, then resize the export
Cropping removes part of the scene; resizing changes its pixel dimensions. Decide the composition first. In KitForma’s Image Cropper, select the rectangle that keeps the full product and necessary context. Then use Image Resizer for the output dimensions while preserving the intended proportions. Stretching a photograph to fit a square can make the product look physically different.
Suppose the source is 3000 × 2400 pixels and the product is centered. A square crop of 2400 × 2400 removes 300 pixels from each side. Check that the handle, packaging or printed label does not occupy those strips. If it does, shift the crop or go back to a wider source rather than squeezing the object horizontally.
For a rectangular item such as wall art, enough background around the frame can help several crop shapes retain the whole object. Do not claim a fixed percentage as an official safe area. The useful test is visible: does the complete product survive your chosen square and landscape previews, and is its scale still clear?
Source: 3000 × 2400 px
Square crop: left 300, top 0, width 2400, height 2400
Removed: 300 px from each side
Check: handle, frame corners, labels, scale reference
Test readability at a deliberately small size
Make a temporary preview around 300 pixels wide and look at it without zooming. This is an editorial stress test, not an official Etsy display width. If the main object is unclear, simplify the composition. If a necessary label becomes a blur, shorten it, increase its size in your design app or move the explanation to another image.
Use one short statement rather than a paragraph over the photograph. Keep important lettering away from busy texture and provide enough contrast to distinguish it. A handwritten font that looks appealing at full size may be hard to read in a card. Inspect the actual letters instead of relying only on a color sample or a font size number.
Avoid using the first image as the entire instruction manual. A second image can show dimensions, another can show a close detail, and another can explain the included files. Keep those images consistent enough to look like one product, while giving each a specific question to answer. Verify every stated quantity against the delivered package.
- Create a small temporary preview from the final composition.
- Identify the product before reading any supporting text.
- Check the full silhouette and the most important detail.
- Move explanations that cannot be read comfortably to a supporting image.
Inspect color and compression separately
Etsy’s color guidance points to sRGB when uploaded colors differ from the original. Set and verify the color profile in a color-managed editor when accurate product color matters. KitForma’s format conversion is not a substitute for a dedicated color-profile workflow or a calibrated product photograph.
JPEG is often worth testing for a photograph; PNG can be useful for crisp flat graphics. Treat those as export choices, not a guarantee that one will always be smaller. Save a trial, check the resulting byte size, and inspect high-contrast lettering and fine edges. Compression that looks acceptable on a plain background can damage small text.
KitForma’s target-size compression can reduce quality and, when needed, dimensions to approach a requested size. Recheck the saved width and height after processing. Do not repeatedly recompress a previously compressed copy when you still have the original. Compare candidates made from the same master so quality differences are easier to judge.
Finish in the listing preview
Open the downloaded export locally, then inspect the marketplace preview after uploading. Review the first image as a small card and as a larger product view. Look for clipped edges, text that competes with the product, a color shift or a preview file that still contains an internal draft label. Repeat the check on a narrow screen when possible.
Keep a small record of the chosen file, dimensions and revision beside the source. That makes the next update intentional: you can replace a confusing image without overwriting a useful original. The linked KitForma tools prepare local files; they do not publish the listing, predict sales or establish that an image will appear identically everywhere.
KITFORMA
Put it into practice
No account needed. Open an article, then try the matching tool.
Further reading
Sources last reviewed:
How to use this guide
Published by KitForma, maintained by Fatih Erkan. The linked references explain the relevant formats and definitions. Examples use sample inputs; they do not establish a speed, quality or compatibility guarantee for your files. Check the tool’s stated limits and inspect your downloaded result.
Questions & experiences
Share what worked, ask a specific question, or suggest a correction. Never include passwords, private files or personal document details.
Loading community…